Working with the Phishing Dashboard
This article describes the Phishing Dashboard data and the options for viewing and working with the data.
Phishing Dashboard
The Phishing Dashboard, accessed by selecting Phishing Simulation > View All Campaigns, shows a list of your organization’s phishing campaigns. Campaign data is updated every five minutes, but this page must be refreshed to display the updated data.
Campaign status cards
For MSP and MME organizations, the campaign status cards show the statistics for all phishing campaigns of all the SMB organizations associated with the MSP and MME.
For SMB organizations, the campaign status cards show the statistics of all phishing campaigns for the SMB organization only.
Each card is described below:
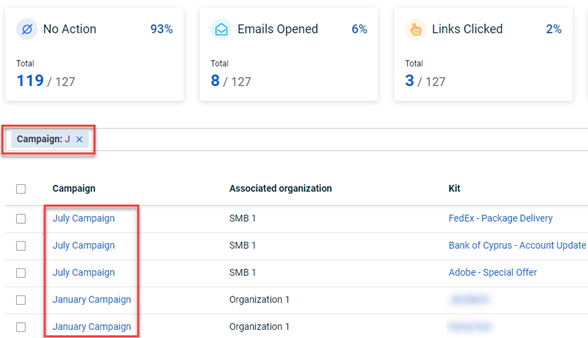
- No Action: The No Action card conveys the number of users who did not open the phishing campaign emails they received.
- Emails Opened: The Emails Opened card shows the number of users who opened the phishing campaign emails but did not click any links (i.e., landing page link, attachment) within.
- Links Clicked: The Links Clicked card displays the number of users who opened the phishing campaign emails and clicked a link (i.e., landing page link, attachment) within.
- Data Submitted: The Data Submitted card shows the number of users who opened the phishing campaign emails, clicked the link to the landing page, and submitted data (e.g., login credentials).
NOTE On the phishing landing page, if a user clicks any link other than the submit button, the status of the clicked link is not tracked. The submit button is the only link tracked.
The first number in each card conveys the number of targets for which the status applies. The second number indicates the total number of phishing emails that were sent. Also, the first number is presented as a percentage of the total number.
In the example above, in the No Action card, of the 127 targets that received campaign emails, 119 targets (93%) did not open the emails.
Phishing Dashboard table
The Phishing Dashboard table data is described below:
- Campaign: Name of the campaign.
- Associated organization: Organization associated with the campaign.
- Kit: Name of the kit included in the campaign.
- Service: Method by which campaign emails are sent. Examples include SMTP, Graphus, SMTP + Graphus, and Graphus + SMTP.
- Status: Conveys the point at which the campaign is in processing. See the Status section below.
- Click Rate: The number of targets who clicked a link (i.e., landing page link, attachment) within the phishing campaign email out of the total number of emails sent. Shown as a percentage as well (e,g., 10% (10/100)).
- Submit Rate: The number of targets who clicked the submit button on the kit’s phishing landing page out of the total number of emails sent. Shown as a percentage as well (e,g., 4% (1/26)).
- Date Created: Date and time the campaign was created. By default, the campaign list is sorted by the Date Created field, with the most recently created campaigns listed first.

NOTE The table data can be sorted by the Campaign, Status, and Date Created fields.
Using the Filter field, you can enter filter criteria so only campaigns that meet the criteria are listed in the table. The filter options are:
- Campaign: Enter the full or partial campaign name.
- Parent Organization: Select a parent organization’s name.
- Associated Organization: Select an associated organization’s name.
- Status: Select a campaign status to display only those campaigns that currently have that status.
- Date Created: Select a date range to display only those campaigns created during that period.
In this example, Campaign is the selected filter and the letter “J” is the criteria. The table lists only campaigns whose name contains the letter “J” (not case-sensitive).
A campaign’s status signifies the stage at which the campaign is in the execution process.
- Scheduled: The initial status after the campaign has been created.
- Processing: The campaign start date and time has arrived and BullPhish ID initiates campaign delivery. The campaign is considered in progress.
- Sending Emails: Campaign emails begin to be sent. The campaign is considered in progress.
- Running: All campaign emails have been sent. The campaign is considered in progress until the close date and time is reached.
- Completed: The campaign close date and time have been reached.
- Cancelled: Campaign has been cancelled.
You can view the details for a campaign by clicking the name of the campaign in the table or by clicking the campaign’s View icon in the last column.
Each status card on the Details page has the same meaning as its corresponding card on the Phishing Dashboard, but the data is for the selected campaign only. The Email Log identifies the Status of each target. 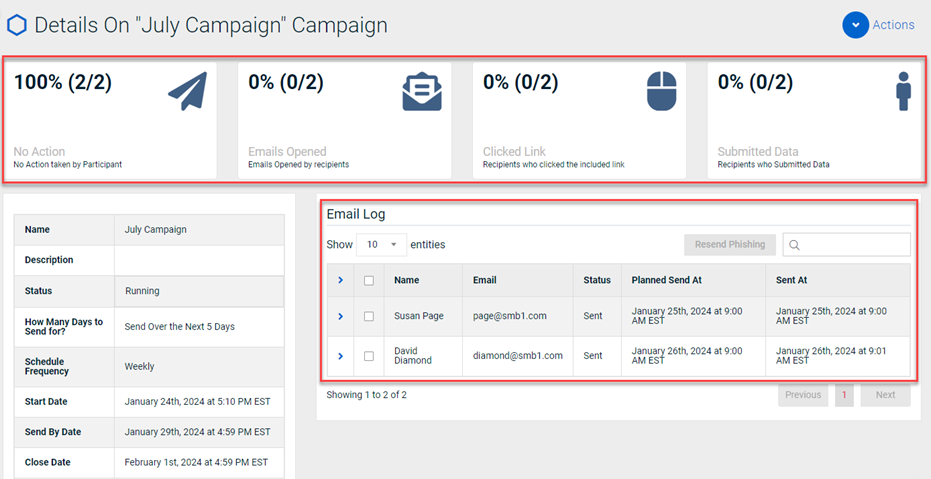
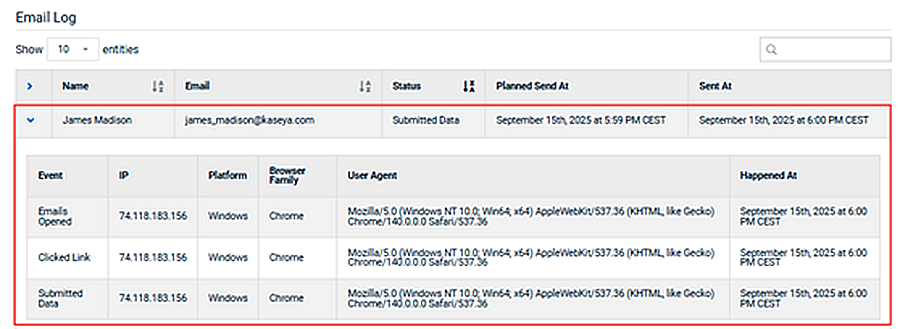
In the Email Log, you can expand the row for the desired target to see the captured data.
The Email Log includes the following information:
- Event: Identifies the action taken by the target. For example, opening the email, or submitting data, such as login credentials.
- IP: The IP address of the target's device.
- Platform: The operating system of the target's device.
- Browser Family: The browser used on the target's device.
- User Agent: Identifies the browser version and compatibility details for the target's device. Legacy-compatible versions are often included to ensure access to older sites.
- Happened At: The timestamp (in UTC) when event occurred.
This example shows three actions taken by the target, resulting in an event being created for each action.
In this example, the target took no action on the phishing email, so their event table is empty.
NOTE The time zone displayed in the campaign summary table and the Email Log indicate the time zone for which the campaign was created.
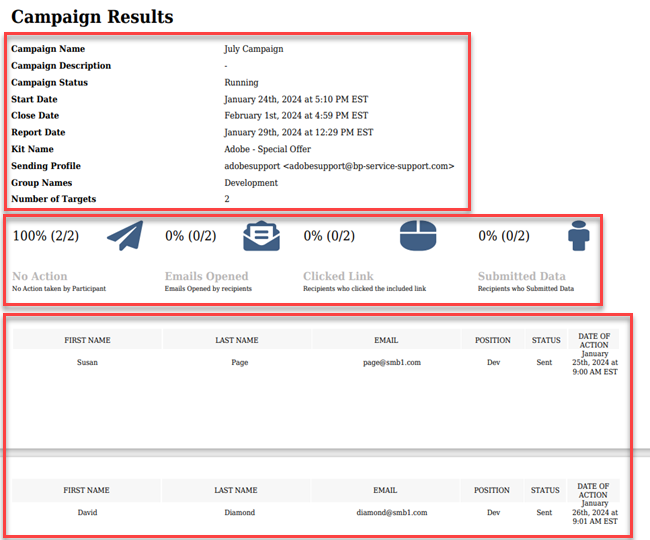
From the campaign’s Details page, you can generate a PDF report and a CSV report.
The PDF report includes campaign summary information, such as the Campaign Status, Start Date, and Kit Name. The PDF report also includes status card data as well as the following target data:
- First Name
- Last Name
- Position
- Status
- Date of Action: The date and time of the last status change.
PDF report example
Using the Export CSV Report modal, you can select the data you would like included in a CSV report. The Export CSV Report modal for phishing campaigns is shown below.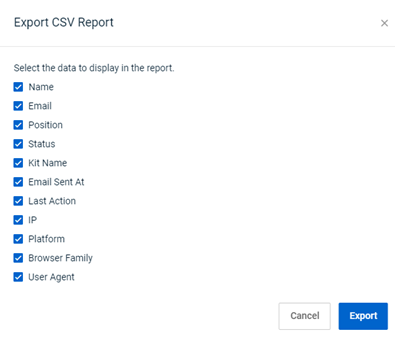
CSV report example
How to...
- In the upper-right corner of the campaign’s Details page, select Actions > Generate CSV Report.

- In the Export CSV Report modal, the check boxes for all data are pre-selected. You can clear the check boxes for any data you don’t want included in the CSV report.

- In the bottom-right corner, click the Export button.
- When the report is generated, click the Download button and save it to the desired location.

| Revision | Date |
|---|---|
| Campaign details section: Added Email log info. | 11/3/25 |

