Creating a custom phishing kit
This article includes the steps for creating, editing, and deleting a custom phishing kit.
NOTE A video tutorial is available at the end of this article.
Prerequisites
-
A partner administrator, partner agent, and privileged user can create, edit, and delete a custom phishing kit.
Phishing kit
A phishing kit includes an email template, landing page, and sending profile.
Email template
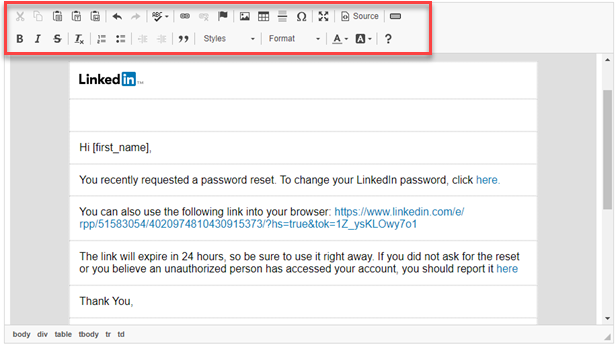
The contents of a phishing email are generated from an email template. When creating a custom phishing kit, you can edit a pre-existing email template or create a brand-new template.
NOTE You can create a brand-new email template while performing the steps to create a custom phishing kit. However, it is recommended that you create the new email template first by following the steps in the article, Creating a custom email template. Then, while creating your custom phishing kit, you can select your new email template from the list of existing templates.
Below is the email template from the LinkedIn – Password Reset – V2 phishing kit. Each link navigates to the landing page.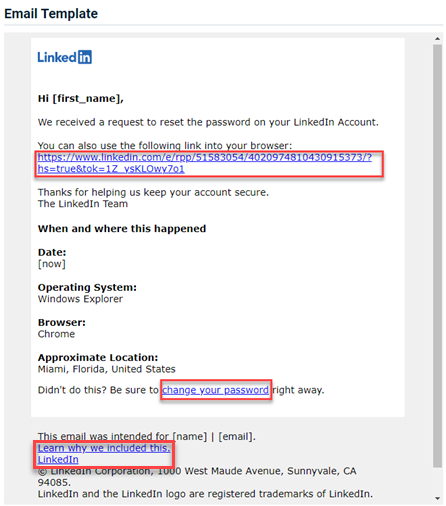
Landing page
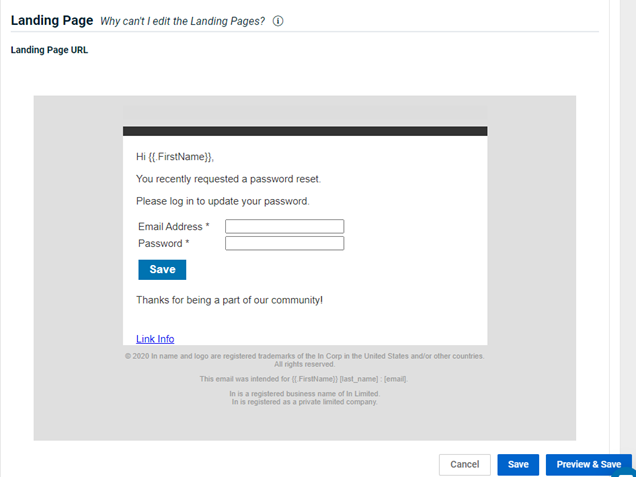
A landing page resembles a legitimate login form. In a phishing attack, cybercriminals often use a phony landing page to retrieve personal information. When creating a custom phishing kit, you are required to select one of the pre-existing landing pages.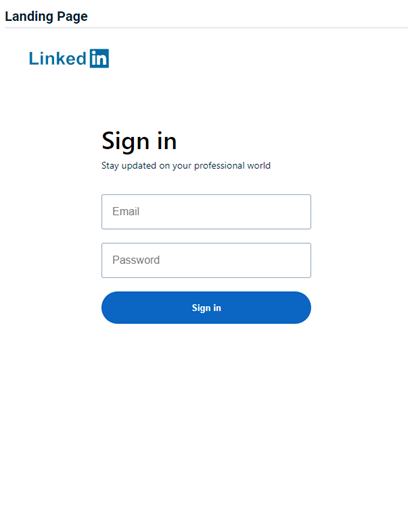
When a target of your phishing campaign submits the form, the action is recorded. A page is displayed notifying the user that this was not a real phishing email. A video is included to educate the user on the dangers of phishing.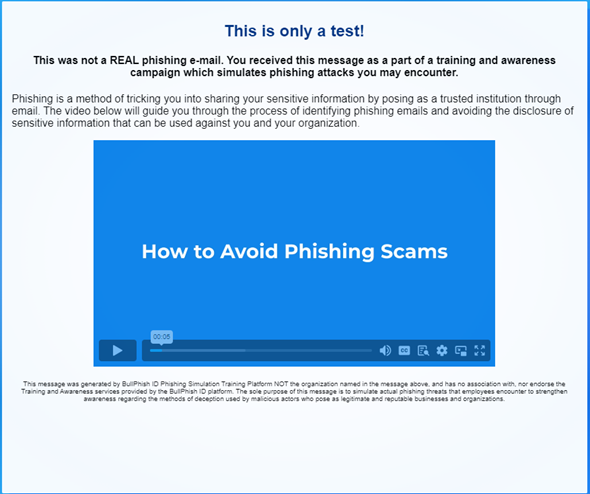
Sending profile
A sending profile is the email address that populates the From field in the target’s email. It is the address from which your campaign will appear to have been sent.

You can select one of the pre-existing sending profiles or you can create your own and select it when creating your custom phishing kit. See the article
How to...
- In the navigation menu, select Phishing Simulation > Phishing Kits.
- In the upper-right corner, click + Create New Kit.

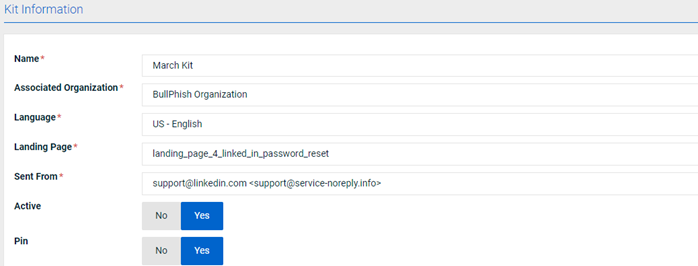
- Enter kit information:
- Name: Enter a name for your kit.
- Associated Organization: Select the organization for which the kit is being created. The kit will only be available when creating a phishing campaign for this organization. To make the kit available to all your SMBs, select the name of your MSP.
- Language: Select the language in which the kit is being created.
- Landing Page: Select a landing page.
- Sent From: Select a sending profile.
- Active: A kit must be active (Yes selected) for it to be available when creating a phishing campaign.
- Pin: If you would like the kit to appear at the top of the Kit selection list when creating a phishing campaign, select Yes.
- For Existing Template, select Yes.
NOTE If you leave No selected, you will need to create the email template in the Email Template Information section. If you want to create a new email template, it is recommended that you create the new email template first by following the steps in the article Creating a custom email template. Then, create the custom phishing kit and for Existing Template, select Yes. In the Template list, select your new template.
- In the Template list, select an email template.

- If you want to include an attachment in the email:
- Click Add New.
- In the Title field, enter a file name.
- In the File Type list, select the file type.
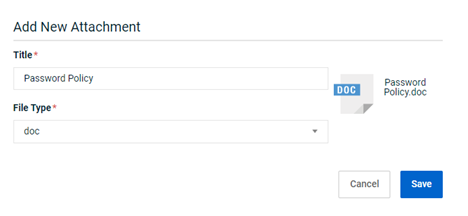
- Click Save. The attachment is listed.
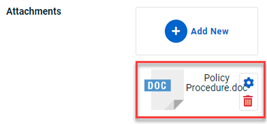
NOTE An attachment is a visual representation of a file. There is not file content.
- In the Email Template Information section:
- The Name field auto-populates with the date and time you selected the template in the Template field. This is followed by the name of the template. If desired, you can edit the contents of the Name field.

- The Email Title users will see field auto-populates with the information that will appear in the email’s Subject field. If desired, you can edit the contents of this field.

- If desired, make changes to the content of the email. You can use the toolbar for editing.
- The Name field auto-populates with the date and time you selected the template in the Template field. This is followed by the name of the template. If desired, you can edit the contents of the Name field.
NOTE For information about using the List of Variables, see the article Creating a custom email template.
- The Landing Page section displays the contents of the landing page, which cannot be edited.
- Click Save or Preview & Save.
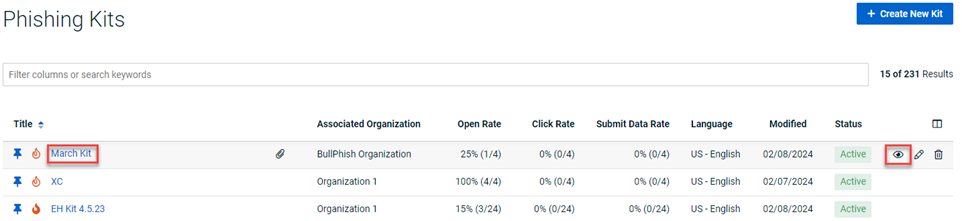
You can view global kits and kits created for a specific organization. You can edit or delete only kits that have been created for a specific organization. You cannot edit or delete global kits.
- In the navigation menu, select Phishing Simulation > Phishing Kits.
- To view the:
- Kit's details, click the kit title.
- Kit’s landing page, click the View icon in the last column.
- To edit a kit’s attributes, click the Edit icon in the last column.
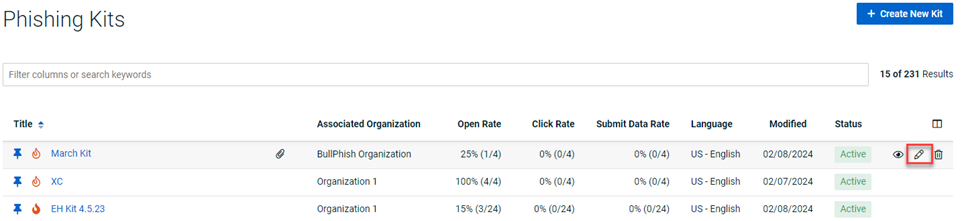
- Make the desired edits and click Save.
NOTE A scheduled campaign that includes a kit that has since been made Inactive will not be affected. The campaign will run as scheduled.
- To delete a kit, click the Delete icon in the last column.

- In the confirmation modal, click Delete.
Tutorial: How to Create a Phishing Kit
| Revision | Date posted |
|
Added tutorial video. |
8/23/24 |


