Microsoft Office 365: Automatically adding safe senders to Microsoft Outlook
This guide describes how to create and run scripts to automatically add safe senders to each of your user's Safe Senders list in Microsoft Outlook.
When you add new users to your Microsoft 365 environment, the BullPhish ID sending domains will be added to the new users' Safe Senders list automatically.
Prerequisites
- You must have already completed the section Configuring Microsoft 365 Defender in the article, Microsoft Office 365 safelisting guide .
- To run scripts, you must have a Windows machine.
- To run scripts in the background, you must have PowerShell v7 installed.
- You must access Azure Active Directory to create an unattended authentication mechanism.
- In this guide, you are instructed to download files and create and save new files. It is recommended that you create a local directory on your system in which to place these files.
IMPORTANT After completing the steps in this article, you must go back to the Microsoft Office 365 safelisting guide and complete the following sections:
- Preventing Microsoft Defender from rewriting BullPhish ID campaign links.
- Preventing an email non-delivery error.
Set up app-only authentication
An initial onboarding is required for authentication using application objects. Application and service principal are used interchangeably, but an application is like a class object while a service principal is like an instance of the class. You can learn more about this at Application and service principal objects in Azure Active Directory.
How to automatically adding safe senders to Microsoft Outlook
NOTE If you encounter problems, check the required permissions to verify that your account can create the identity.
- In your browser, access the Azure AD portal, https://portal.azure.com/.
- Login with your credentials.
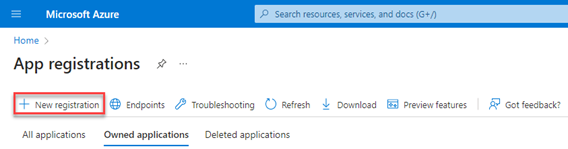
- Click App registrations.
NOTE You may have to perform a search to find the App registrations service.
- On the App registrations page, click New registration.
- On the Register an application page, configure the following settings:
- Name: Enter something descriptive. For example, BullPhish ID.
- Supported account types: Verify that Accounts in this organizational directory only (bpid only - Single tenant) is selected.
To make the application multi-tenant for Exchange Online delegated scenarios, select the value Accounts in any organizational directory (Any Microsoft Entra ID tenant - Multitenant). - Redirect URI (optional): Do not enter any information in this section.
You can't create credentials for native applications, because you can't use that type for automated applications.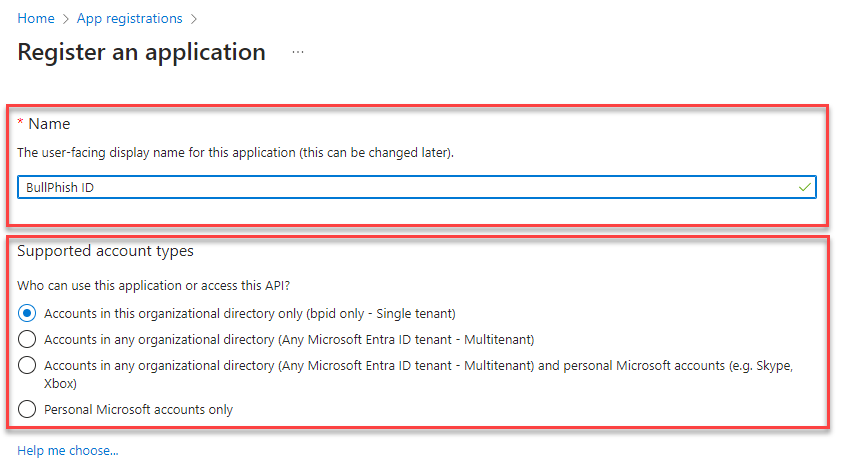
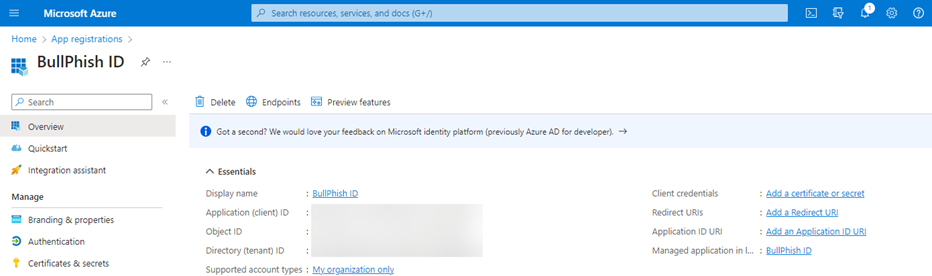
- Click Register. The App registrations page is displayed for the new application.
NOTE The procedures in this section replace any default permissions that were automatically configured for the new app. The app doesn't need the default permissions that were replaced.
- On the App registrations page, in the navigation menu, click Manifest.

- Copy the following code block:
"requiredResourceAccess": [
{
"resourceAppId": "00000002-0000-0ff1-ce00-000000000000",
"resourceAccess": [
{
"id": "dc50a0fb-09a3-484d-be87-e023b12c6440",
"type": "Role"
}
]
}
],
- On the Manifest page, find the requiredResourceAccess entry (on line 61 through line 71, approximately). Highlight the lines of code.
- Paste the copied code over the highlighted code.
NOTE Microsoft 365 GCC High or DoD environments have access to Security & Compliance PowerShell only. For these environments, use the following values:
resourceAppId: "00000007-0000-0ff1-ce00-000000000000"
resourceAccess id: "455e5cd2-84e8-4751-8344-5672145dfa17"
resourceAccess type: "Role"
- Click Save.
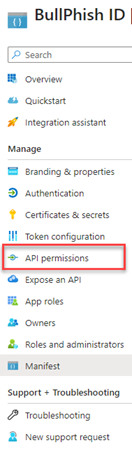
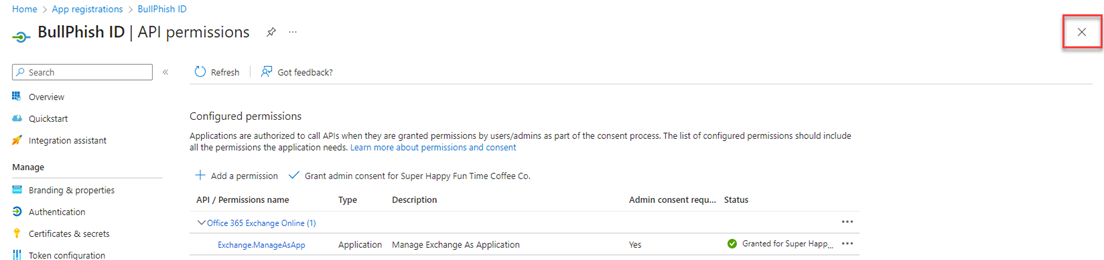
- In the navigation menu, click API permissions.
- On the API permissions page, configure the following settings:
- API / Permissions name: Verify the value Exchange.ManageAsApp is shown.

Note: If it is not, click Add a permission > APIs my organization uses. Search for Office 365 Exchange. - Click Grant admin consent for<organization>.

- In the confirmation modal, click Yes. The Status for Exchange.ManageAsApp indicates Granted.

- API / Permissions name: Verify the value Exchange.ManageAsApp is shown.
- In the upper-right corner, click the X to close the API permissions page and return to the App registrations page.
- On your taskbar, click the Windows icon.
- Start typing Powershell. In the Windows Powershell pane, click Run as Administrator.

- Copy the following code and paste it into a text editor (i.e., Notepad).
# Create certificate
$mycert = New-SelfSignedCertificate -DnsName "contoso.org" -CertStoreLocation "cert:\CurrentUser\My" -NotAfter (Get-Date).AddYears(1) -KeySpec KeyExchange

# Export certificate to .pfx file
$mycert | Export-PfxCertificate -FilePath "cert location\mycert.pfx" -Password (Get-Credential).password

# Export certificate to .cer file
$mycert | Export-Certificate -FilePath "cert location\mycert.cer"
- Delete all comment lines (i.e. # Create certificate).
- Delete empty lines between each line of code.
- Edit the following:
- New-SelfSignedCertificate -DnsName "contoso.org"
- Replace contoso.org with name of your domain. - $mycert | Export-PfxCertificate -FilePath "cert location\mycert.pfx" -Password (Get-Credential).password
- Replace cert location with the path where you want to save the mycert.pfx file. - $mycert | Export-Certificate -FilePath "cert location\mycert.cer"
- Replace cert location with the path where you want to save the mycert.cer file.
Example: Here is an example with the required edits:
- New-SelfSignedCertificate -DnsName "contoso.org"
- Copy the code in the editor and paste it into PowerShell.
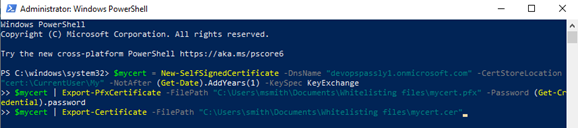
- Press Enter.
- The Windows PowerShell credential request dialog box displays. The credential prompt is not for your Windows login. It is used only to set the password for the .pfx certificate file. Enter any value in the username field (it is ignored) and choose a strong password for the password field. (Save this password—you must enter it exactly when instructed in Step 8: Edit the Config.ps1 file.) Click OK.
After you register the certificate with your application, you can use the private key (.pfx file) or the thumbprint for authentication.
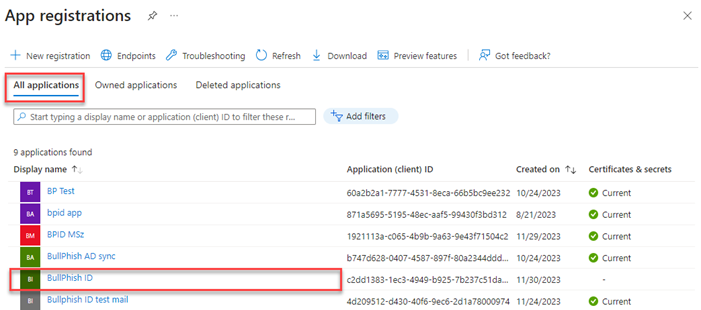
- In your browser, select the App registrations - Microsoft Azure tab.
- Click the All applications tab.
- Select your application.
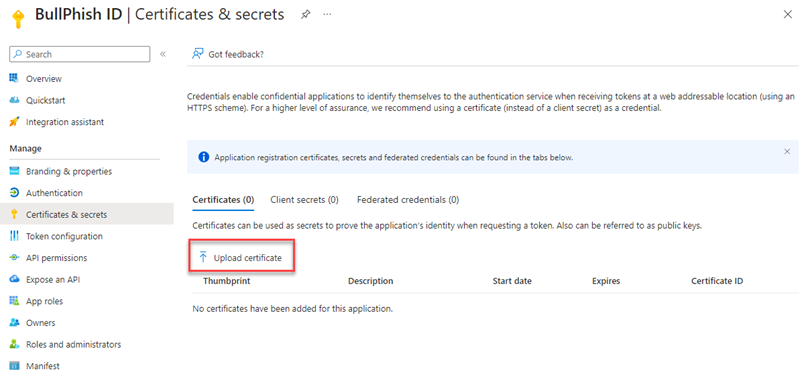
- In the navigation menu, click Certificates & secrets.
- Click the Certificates tab.
- Click Upload Certificate.
- In the Upload Certificate modal, click the folder icon.
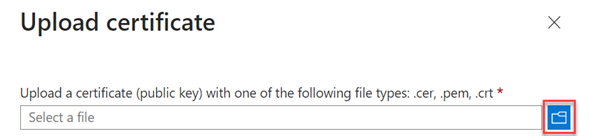
- Navigate to the location where you saved the mycert.cer certificate.
- Select the certificate and click Open.
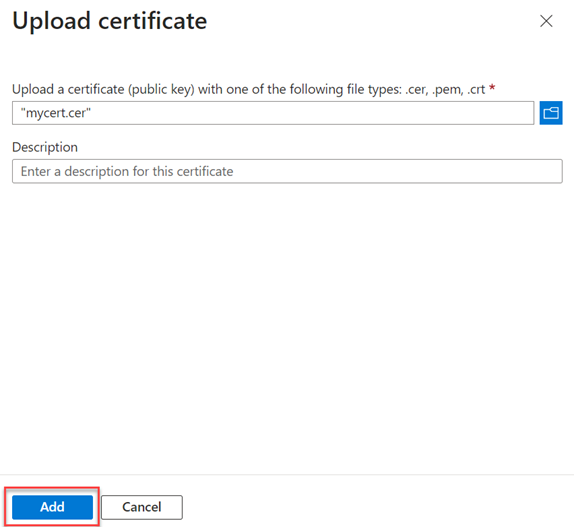
Note: The Description field is optional. - Click Add.
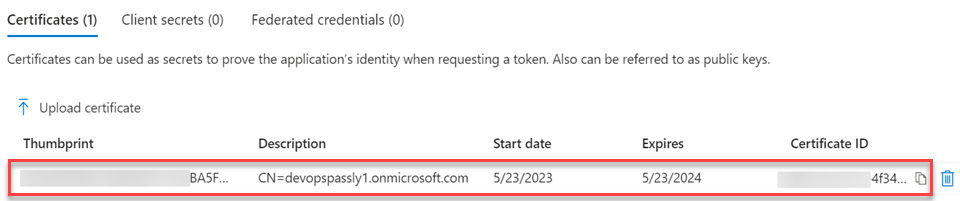
- The certificate is listed on the Certificates tab.
NOTE For multi-tenant applications in Exchange Online delegated scenarios, you need to assign permissions in each customer tenant.
Assign Azure AD roles to the application
The supported Azure AD roles are indicated in the following table: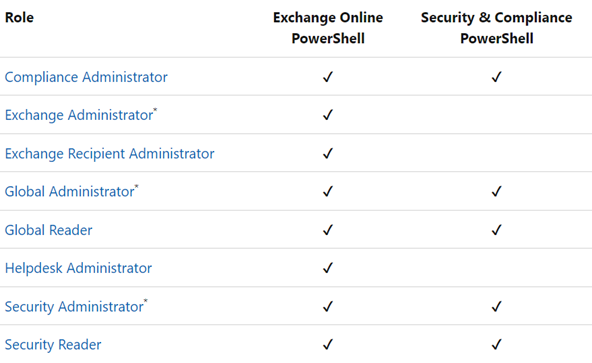
The Global Administrator and Exchange Administrator roles provide the required permissions for any task in Exchange Online PowerShell. For example:
- Recipient management.
- Security and protection features. For example, anti-spam, anti-malware, anti-phishing, and the associated reports.
The Security Administrator role does not have the necessary permissions for those same tasks.
The following steps are slightly different for Exchange Online PowerShell vs. Security & Compliance PowerShell. The steps for both environments are shown. To configure roles for both environments, repeat the steps in this section.
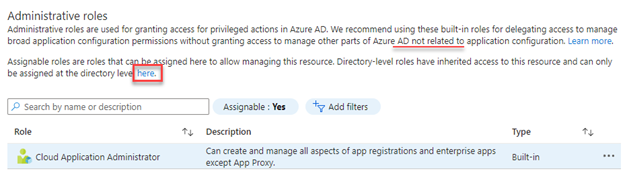
- In the navigation menu, click Roles and administrators.
- Click the here link to access the directory level.
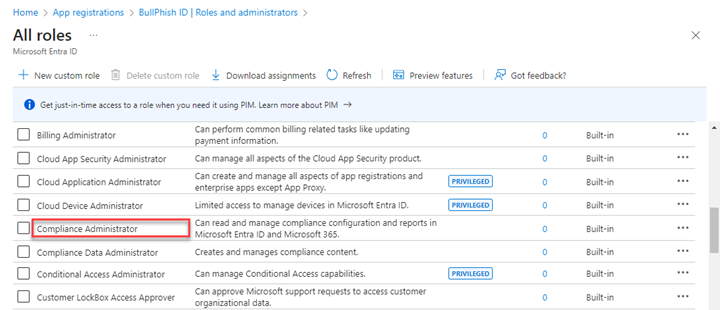
- Find the applicable administrative role.
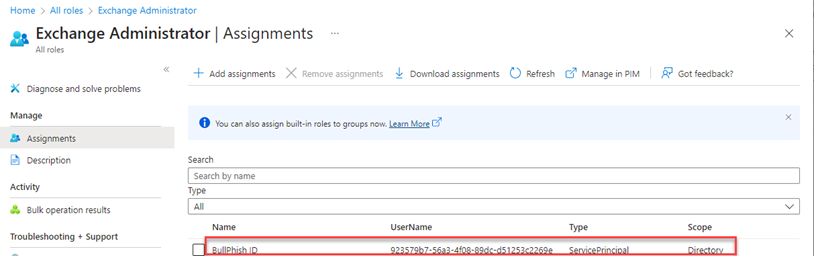
- Exchange Online PowerShell: Search for and select the Exchange administrator role
(do not select the role's check box).
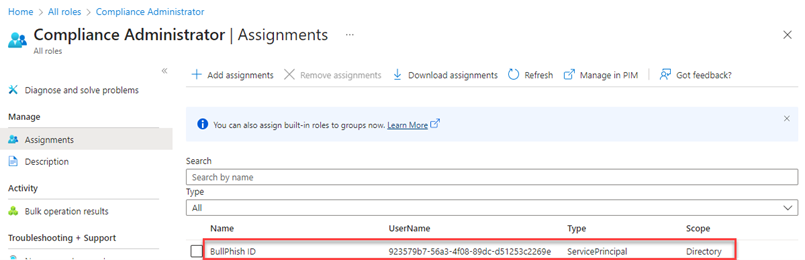
- Security & Compliance PowerShell: For example, search for and select the Compliance Administrator role (do not select the role's check box).
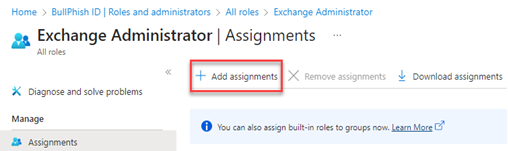
- Exchange Online PowerShell: Search for and select the Exchange administrator role
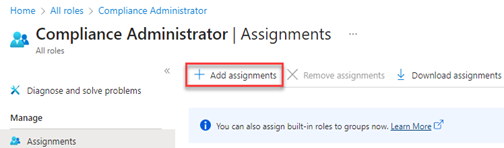
- On the Assignments page, click Add assignments.
- Exchange Online PowerShell:
- Security & Compliance PowerShell:
- Exchange Online PowerShell:
- In the Add assignments modal, in the Search box, start typing the name of the app you created. When it appears in the list, select it.
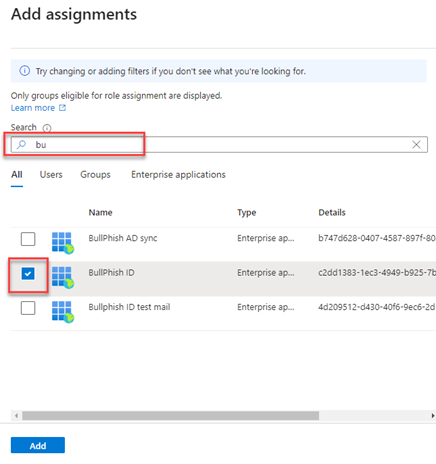
- At the bottom of the page, click Add. On the Assignments page, you can see the role has been assigned to the app.
- Exchange Online PowerShell:
- Security & Compliance PowerShell:
- Exchange Online PowerShell:
- Create a new text file named addSaveSenders_Revised.ps1. Make sure the file extension is .ps1. You may want to copy the file name from this step to make sure you save the text file with the correct name.
- Copy the following code:
param($ConfigPath)
. $ConfigPath

if (!(Get-Module -ListAvailable -Name ExchangeOnlineManagement)) {
  Install-Module ExchangeOnlineManagement -Force
}
Import-Module ExchangeOnlineManagement

foreach($Config in $Configs) {
  $out = 'Adding Trusted Senders for organization {0}' -f $Config.Organization
  Write-Output $out
  Connect-ExchangeOnline -AppId $Config.AppId -CertificateFilePath $Config.CertificateFilePath -CertificatePassword (ConvertTo-SecureString -String $Config.CertificatePassword -AsPlainText -Force) -Organization $Config.Organization

  $users = Get-EXOMailbox -ResultSize unlimited
  foreach($user in $users){
    $out = 'Adding Trusted Senders to {0}' -f $user.UserPrincipalName
    Write-Output $out
    Set-MailboxJunkEmailConfiguration $user.UserPrincipalName -TrustedSendersAndDomains @{Add=$Senders}
  }

  Disconnect-ExchangeOnline -Confirm:$false
}

Write-Output "Finished!"
- In the addSaveSenders_Revised.ps1 file, paste the code.
- Save the file.
- Create a new text file named Config.ps1. Make sure the file extension is .ps1. You may want to copy the file name from this step to make sure you save the text file with the correct name.
- Copy the following code:
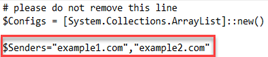
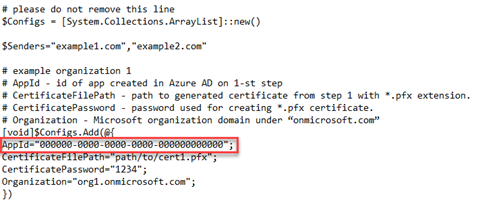
# please do not remove this line
$Configs = [System.Collections.ArrayList]::new()
$Senders="example1.com","example2.com"
# example organization 1
# AppId - id of app created in Azure AD.
# CertificateFilePath - path to generated certificate with *.pfx extension.
# CertificatePassword - password used for creating *.pfx certificate.
# Organization - Microsoft organization domain under “onmicrosoft.com”
[void]$Configs.Add(@{
AppId="000000-0000-0000-0000-000000000000";
CertificateFilePath="path/to/cert1.pfx";
CertificatePassword="1234";
Organization="org1.onmicrosoft.com";
})
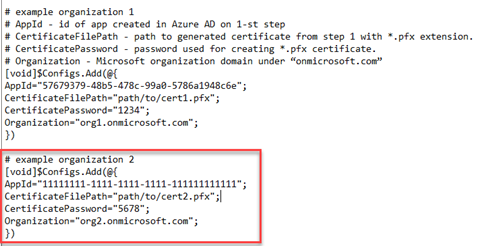
# example organization 2
[void]$Configs.Add(@{
AppId="11111111-1111-1111-1111-111111111111";
CertificateFilePath="path/to/cert2.pfx";
CertificatePassword="5678";
Organization="org2.onmicrosoft.com";
})
- In the Config.ps1 file, paste the code.
- Save the file.
- Download the list of available sending domains that you can use in your training and phishing campaigns.
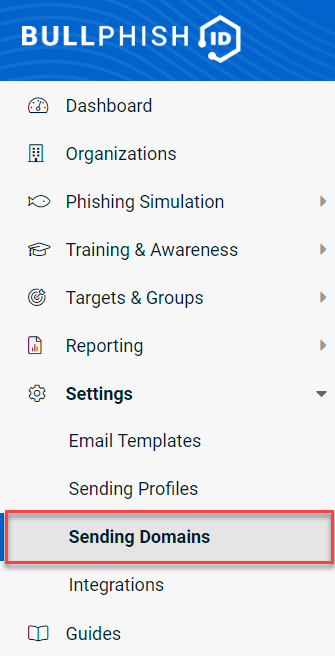
- In BullPhish ID, in the navigation menu, select Settings > Sending Domains.
- In the upper-right corner, click Export Sending Domains.

- Download the Sending_Domains.csv file to the desired location.
- In BullPhish ID, in the navigation menu, select Settings > Sending Domains.
- Open the Sending_Domains.csv file.
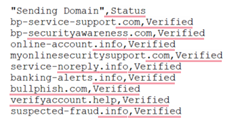
- Copy one of the sending domains you would like to use in your campaigns. For example, bp-service-support.com (do not copy the word Verified).
- In Config.ps1, find $Senders="example1.com","example2.com"
- Replace example1.com with the sending domain you copied, bp-service-support.com in the example. Make sure it has opening and closing quotation marks.
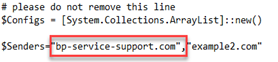
- For the next sending domain you would like to use, copy it from the Sending_Domains.csv file. In the Config.ps1 file, replace example2.com with the sending domain you copied.
- On the same line, add the rest of the domains you would like to use. Make sure each is enclosed in quotation marks and a comma separates each domain.

- Save the file.
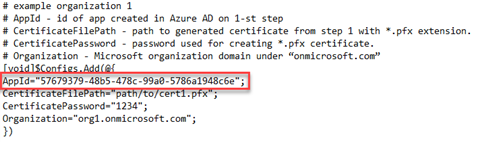
- In Azure, navigate to the App registrations page.
- On the All applications tab, find the name of your application.
- Copy the Application (client) ID number.

- In the Config.ps1 file, in the example organization 1 section, find the AppId code line.
- Replace the AppId number with the Application ID you copied. Make sure it is enclosed in quotation marks and the line ends with a semi-colon.
- Save the file.
- Complete the following information:
- CertificateFilePath="path/to/cert1.pfx";
Enter the location path where the certificate is saved.
For example, CertificateFilePath="C:\Users\msmith\Documents\Whitelisting files\mycert.pfx"; - CertificatePassword="1234";
Enter the .pfx certificate file password you created in Step 3: Generate a self-signed certificate.
For example, CertificatePassword="He3445jq3#"; - Organization="org1.onmicrosoft.com";
Enter the name of your organization.
For example, Organization="myorgdomain.onmicrosoft.com";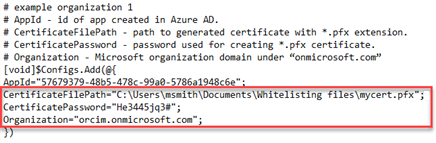
- CertificateFilePath="path/to/cert1.pfx";
- If you are adding another organization, go to step 18. If not, delete the # example organization 2 code block.

- Save the file.
- To add another organization, perform the main steps:
- Step 1: Register the application in Azure AD.
- Step 2: Assign API permissions to the application.
- Step 3: Generate a self-signed certificate.
- Step 4: Attach the certificate to the Azure AD application.
- Step 5: Assign Azure AD roles to the application.
- In the Config.ps1 file, complete the # example organization 2 code block.
- Save the file.
- Copy the following code and paste it into a text file.
powershell -ExecutionPolicy unrestricted -File "\Path\To\addSaveSenders_Revised.ps1" -ConfigPath "\Path\To\Config.ps1"
- Replace "\Path\To\addSaveSenders_Revised.ps1" with the location in which you saved addSaveSenders_Revised.ps1.
(e.g., "C:\Users\bsmith\Documents\Documentation\addSaveSenders_Revised.ps1"). - Replace "\Path\To\Config.ps1" with the location in which you saved Config.ps1 (e.g., "C:\Users\bsmith\Documents\Documentation\Config.ps1").
- Copy the edited PowerShell line of code from your text file.
- Paste it into PowerShell and press Enter.

- Follow any prompts, if presented. Make sure there are not any errors as script is running.
Sample script output:
Adding Trusted Senders for organization
{organization1_name_here}
Adding Trusted Senders to {org1_username1}
Adding Trusted Senders to {org1_username2}
Adding Trusted Senders for organization
{organization2_name_here}
Adding Trusted Senders to {org2_username1}
Adding Trusted Senders to {org2_username2}
Finished! -
When done, Finished! will display.
- On your taskbar, click the Windows icon.
- Start typing Task Scheduler.
- When it appears in the list, open it.
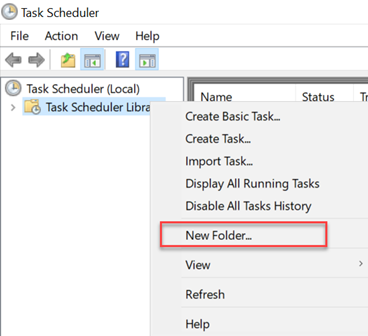
- Right-click Task Scheduler Library and select New Folder.
- Enter a folder name and click OK.
- Expand the Task Scheduler Library branch and select the folder you created.

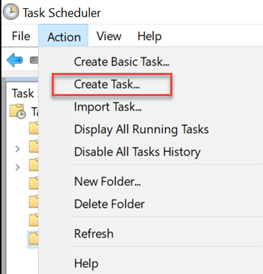
- Select Action > Create Task.
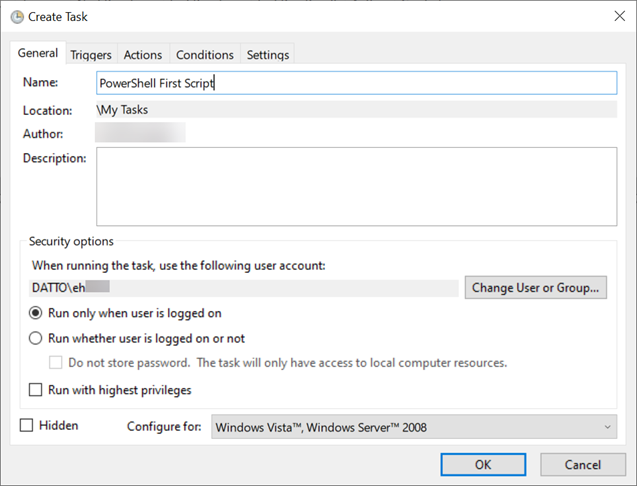
- On the General tab:
- In the Name box, type a short descriptive name for the task. For example, PowerShell First Script.
- In the Description box, create a description for the task (optional).
- In the "Security options" section, you can configure which administrator account can run the task.
Quick Tip: The default user should be exemplary if using an account with administrative privileges. Assume you're running a Command Prompt or PowerShell command. In this case, you can select the Run whether a user is logged on or not option to prevent the command window from showing up when the task runs automatically. - Select Run with the highest privileges option if the task requires elevated privileges (optional).
- The "Configure for" settings should be left alone unless you're required to use a different compatibility option.
- Click the Triggers tab and click New.
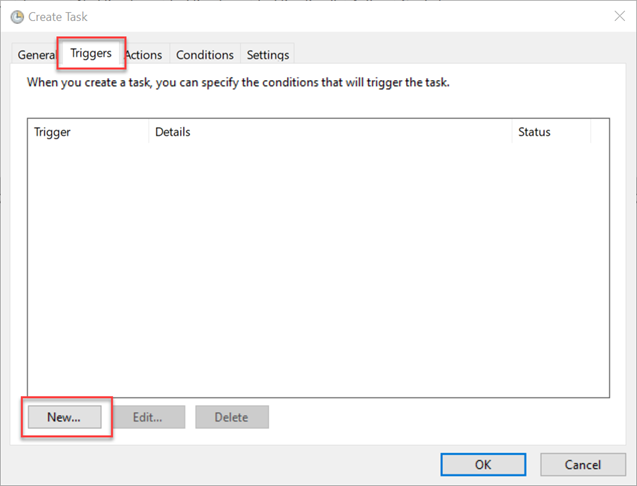
- In the Begin the task list, select On a schedule.
- Complete the following sections:
- Settings
- Start
- Advanced settings (optional)
- Select Enabled
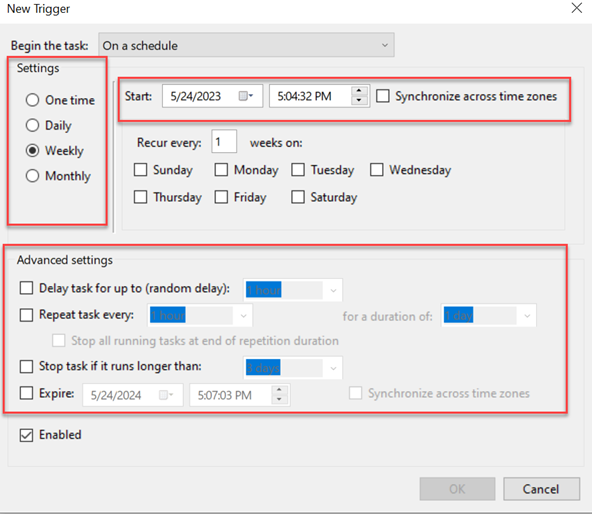
- Click OK.
- Click the Actions tab and click New.
- In the Action list, select Start a program.
Note: You can still use the Send an e-mail or Display a message option, but these are deprecated features. They may not work because Microsoft is no longer maintaining them. - In the Program/script box, specify the application's path. If you don't know the path of the app, click the Browse button to find it. However, if it's a general application like PowerShell or Command Prompt, you only need to enter the file name.
- In the Add arguments box, enter the ExecutionPolicy command created in Step 9: Run the scripts in PowerShell (i.e., -ExecutionPolicy unrestricted -File "\Path\To\addSaveSenders_Revised.ps1" -ConfigPath=”Path\To\Config.ps1).
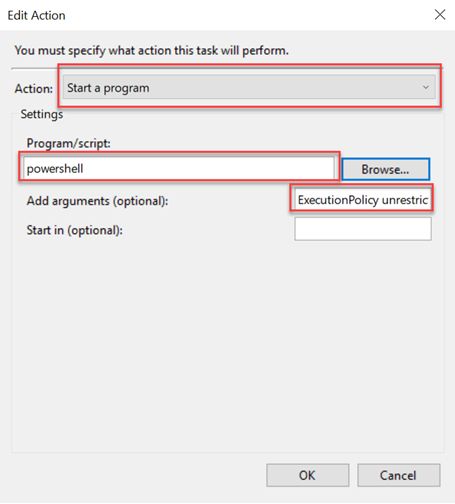
- Click OK.
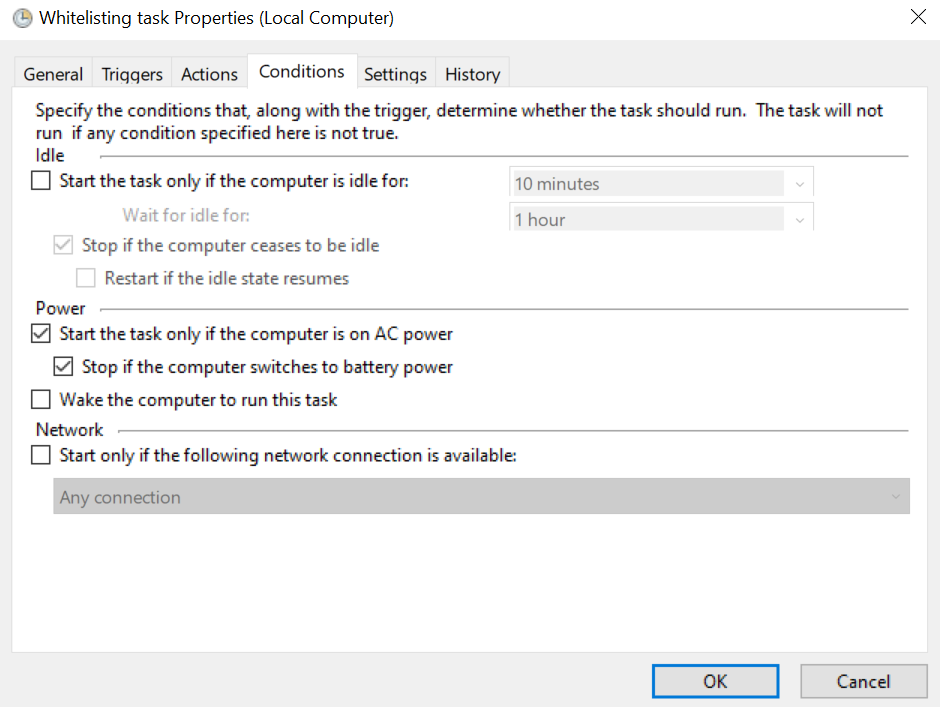
- The Conditions tab includes options that along with the trigger settings, determine when the task should run. This tab is optional.
- On the Settings tab, it is recommended to set the following options:
- Run task as soon as possible after a scheduled start is missed.
- If the task fails, restart every:
- Click OK.
- To test, right-click the task name and select Run.
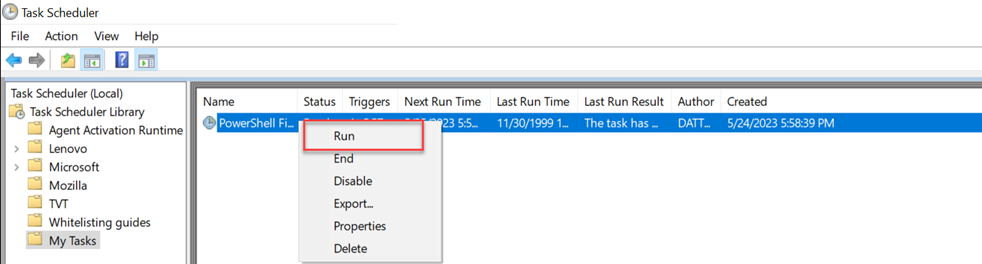
- Click the History tab for results.

IMPORTANT In the article, Microsoft Office 365 Safelisting Guide, complete the following sections:
- Preventing Microsoft Defender from rewriting BullPhish ID campaign links.
- Preventing an email non-delivery error.
| Revision | Date |
|---|---|
| Title changed from Microsoft Office 365 Automatic Safelisting Guide to Microsoft Office 365: Automatically adding safe senders to Microsoft Outlook.
Prereqs: Added - Must complete section Configuring Microsoft 365 Defender in the article, Microsoft Office 365 Safelisting Guide. Tested, updated all steps, screenshots. |
11/30/23 |
| Step 8: Edit the Config.ps1 file: Edited Step 15: Wording for CertificatePassword, added screenshot. | 2/28/24 |
| Step 2: Assign API permissions to the application: Edited step 3 and screenshot. | 4/30/25 |
| Edited Step 6 - Sub-step 2: code. Edited Step 9 - Steps 1, 6 | 1/29/26 |
| Edited Step 6 - Sub-step 2: code. | 3/13/26 |
| Edited Step 3 - Sub-step 9. Edited Step 8 - Sub-step 15. | 3/16/26 |


