Integrating BullPhish ID with INKY
Integrating BullPhish ID (BPID) with INKY ensures that phishing simulation emails from BPID are delivered successfully to end users without triggering INKY’s phishing warnings or banners.
This guide explains:
-
Why the integration is needed.
-
How INKY handles BPID emails by default.
-
The steps for completing the integration.
Why This Integration Is Needed
This integration is essential for maintaining the integrity of phishing awareness campaigns while leveraging INKY’s advanced email security features.
BPID emails are delivered via SMTP. Without proper recognition, INKY may flag these emails as suspicious. By default, INKY analyzes all incoming emails and flags suspicious content to protect users. However, BPID simulation emails are safe and intended for training purposes.
Without proper configuration, INKY may incorrectly classify these emails as threats. The integration resolves this by enabling INKY to recognize BPID simulation emails using DKIM verification and IP addresses, so emails are processed correctly.
When users report a BPID test email as phishing, they see a “Congratulations! You spotted a test email” message, reinforcing training outcomes.
This integration simplifies deployment, ensures reliable delivery via SMTP, and maintains the integrity of phishing awareness campaigns.
Whitelisting not required
Manual whitelisting of BPID IPs or domains is not required in INKY.
INKY automatically recognizes BullPhish ID emails by DKIM verification and their sending IP addresses, so organizations do not need to add BPID IPs or domains to an INKY allowlist.
Custom sending domains do not affect INKY’s ability to recognize BullPhish ID emails by IP.
IMPORTANT To ensure these emails are processed correctly by Microsoft or Google and INKY via end-to-end SMTP delivery, the steps in the "Configuring the integration" section must be completed.
Default INKY behavior for BullPhish ID emails
This section describes how INKY processes BPID training emails and phishing simulations by default.
Training Notifications
INKY delivers BullPhish ID training notifications without generating special warnings. Standard INKY banners may still appear (for example, a neutral banner) based on normal banner settings.
Phishing Simulations
INKY follows configurable settings to determine how simulations are handled (for example, no warnings, always caution, or always indicate danger).
If no configuration is applied, INKY defaults to its normal analysis:
- A gray neutral banner may appear if the simulation does not trigger significant warnings.
- A yellow Caution banner may appear if an email is suspicious but not confirmed as a threat.

- A red Danger banner may appear if INKY detects spoofing or suspicious elements.

For more banner details, see the article INKY Email Assistant Explained.
NOTE This approach ensures training notifications are delivered with minimal interference, while phishing simulations are handled according to customer preferences or INKY’s default protective logic.
User reported phishing email
A user reports a phishing simulation email by clicking the Phish link in the email banner.
INKY displays a confirmation screen indicating that the sender’s address will be added to the user’s personal block list.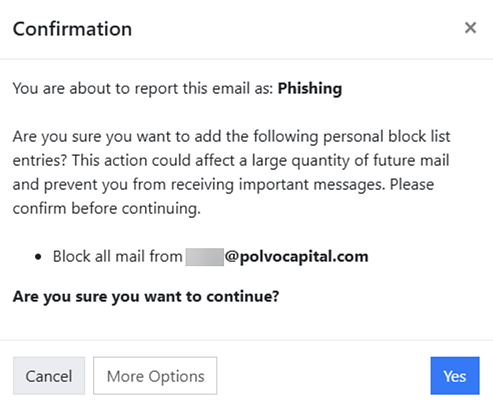
When the user clicks Yes to confirm, a confirmation banner displays a congratulatory message for reporting the phishing email, followed by a second banner listing the resulting actions.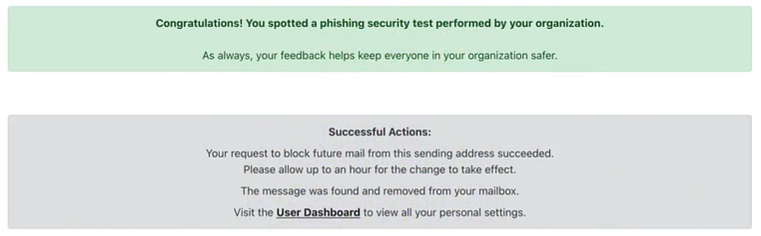
How to...
Configure the integration
To integrate BullPhish ID (BPID) with INKY, follow these steps:
- Configure INKY by performing all steps in the Recommended INKY Configuration section.
- Choose the applicable integration path:
- Current BullPhish ID users: If your organization has already configured Microsoft 365 or Google Workspace to ensure BPID campaign emails are delivered successfully, follow the steps in the Current BullPhish ID Users section.
- New BullPhish ID users: If your organization has not yet configured Microsoft 365 or Google Workspace, follow the steps in the New BullPhish ID Users section to ensure BPID campaign emails are delivered successfully.
The following guides provide instructions for configuring Microsoft 365 or Google Workspace:
In this section, each of the INKY configuration settings are described and recommendations are included.
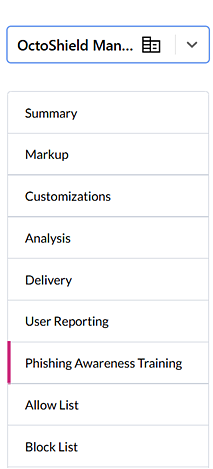
- On the top navigation bar, click Admin Center.

- In the left navigation menu, select Phishing Awareness Training.
- In the Phishing Awareness Training Platforms section, select the BullPhish ID check box.
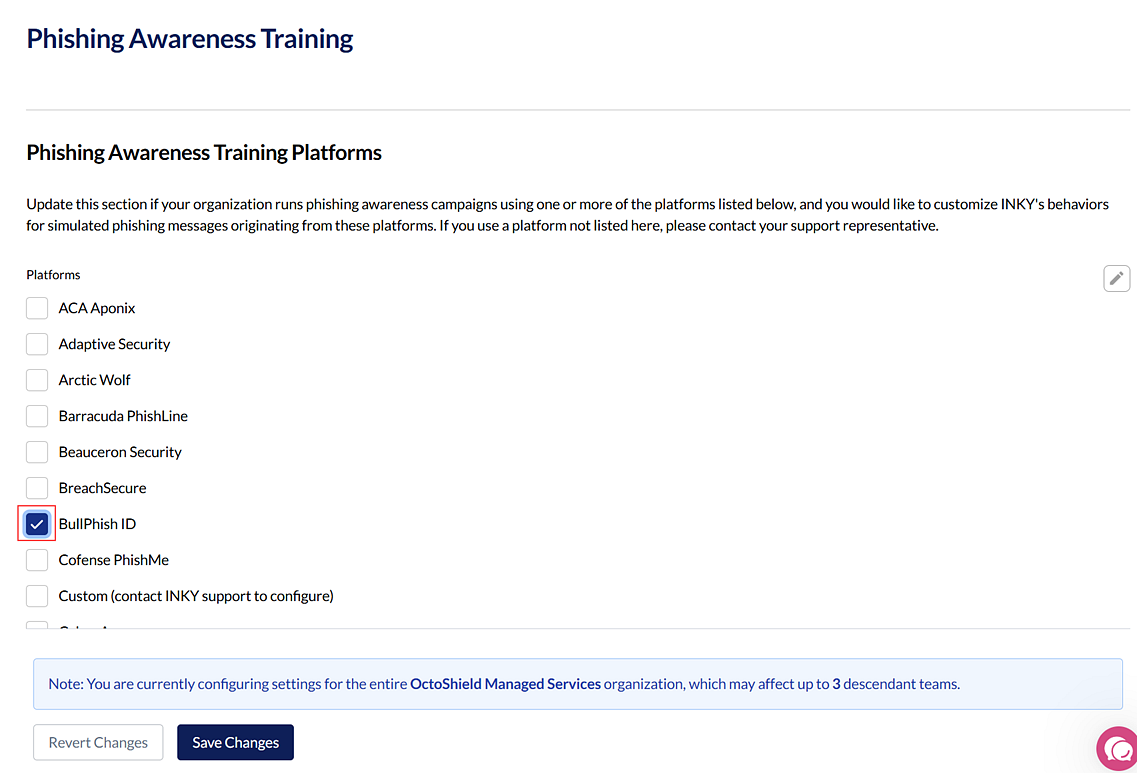
- Scroll to the Custom banner drop-down list. Neutral is selected by default and is the recommended selection.

With the neutral banner, users must determine which messages appear to be phishing attempts. When users correctly identify a phishing email and click Phish, the message “Congratulations! You spotted a test email” is displayed.
The remaining Customer banner options are:- No special treatment; use "natural" INKY results and banner. INKY displays the banner corresponding to its analysis results.
- Caution (users must confirm which messages look like phish).
- Danger (users must confirm which messages look like phish).
- It is recommended you select the check boxes for the following settings:
- Always deliver simulated phishing messages to the user's Inbox (only applies if using INKY's Delivery Settings): This ensures that configurations made in INKY delivery settings, such as IP addresses added to the Block List, do not apply to phishing simulation emails.
- Do not attach raw messages to reports for simulated phishing messages: This option is helpful to avoid false link clicks being reported. Some INKY customers have their message reports sent to ticketing systems which scan the links making it appear as if a user had clicked on the simulated phishing email links.
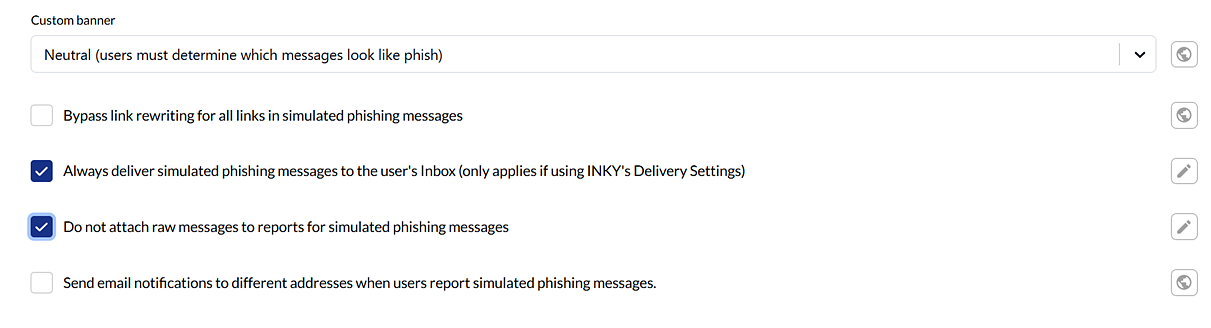
The other options are described as follows: - Bypass link rewriting for all links in simulated phishing messages: INKY does not rewrite links for emails it determines are phishing simulation emails. However, this option can be selected to make sure every possible link rewriting scenario is accounted for.
- Send email notifications to different addresses when users report simulated phishing messages: Select to enter email addresses to send simulation-related user-report notifications to.
- At the bottom of the Phishing Awareness Training page, click Save Changes.
If your organization already has configured Microsoft Office 365 or Google Workspace to ensure BPID campaign emails are delivered successfully and would like to integrate with INKY, follow the steps below for your email platform.
NOTE Microsoft Office 365: A configuration assistant is available for Microsoft Office 365 that automatically configures the IP addresses and domains required by both BullPhish ID and INKY. For instructions, see the INKY article Phishing Awareness Training. The steps below describe how to configure these settings manually.
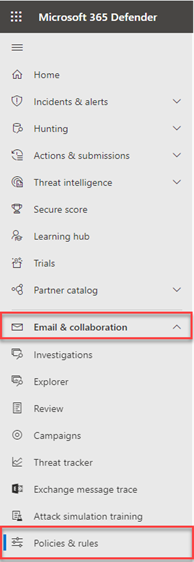
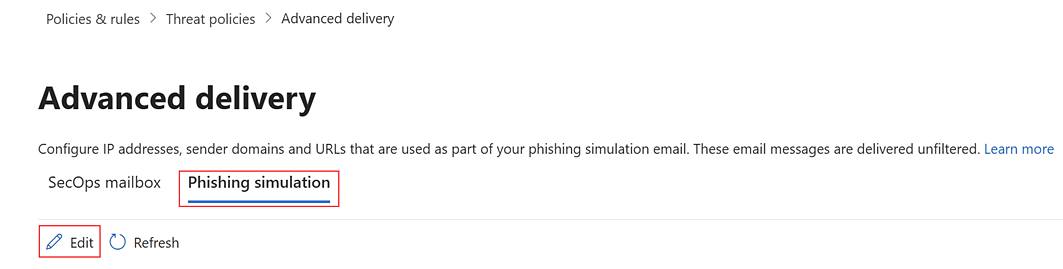
- In the Microsoft 365 Defender navigation menu, select Email & collaboration > Policies & rules.
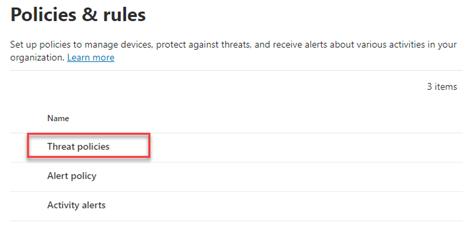
- On the Policies & rules page, click Threat policies.
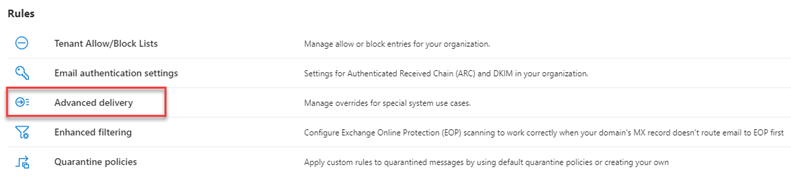
- On the Threat policies page, in the Rules section, click Advanced delivery.
- On the Advanced delivery page, click the Phishing simulation tab and click Edit.
- In the Edit third party phishing simulations modal, click Domain.
- Add the domain specified in the following INKY article to the Domain field and press Enter: Phishing simulations.

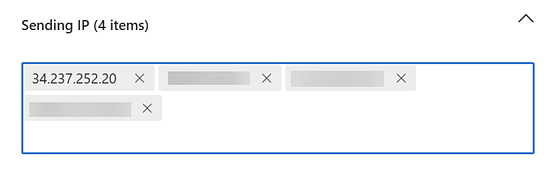
- Click Sending IP.
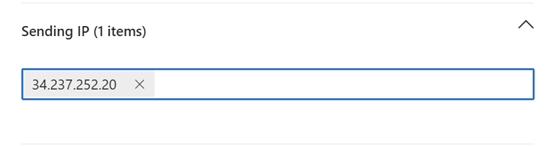
- Add the IP addresses specified in the following INKY article: Phishing simulations. Do not delete IP 34.237.252.20. After entering an IP address, press Enter.
- In the lower-left corner of the Edit third party phishing simulations modal, click Save.
- In the "Changes" confirmation modal, click Close.
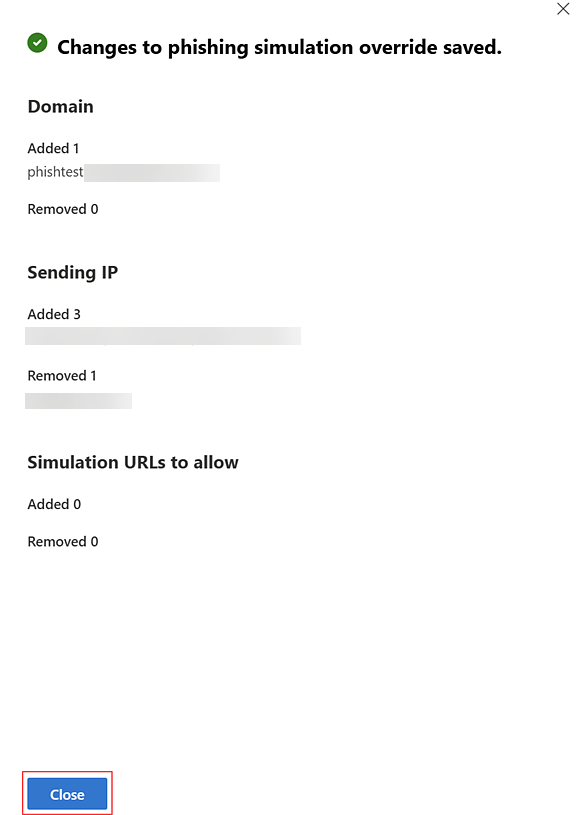
The IP addresses are added to the Phishing simulation table.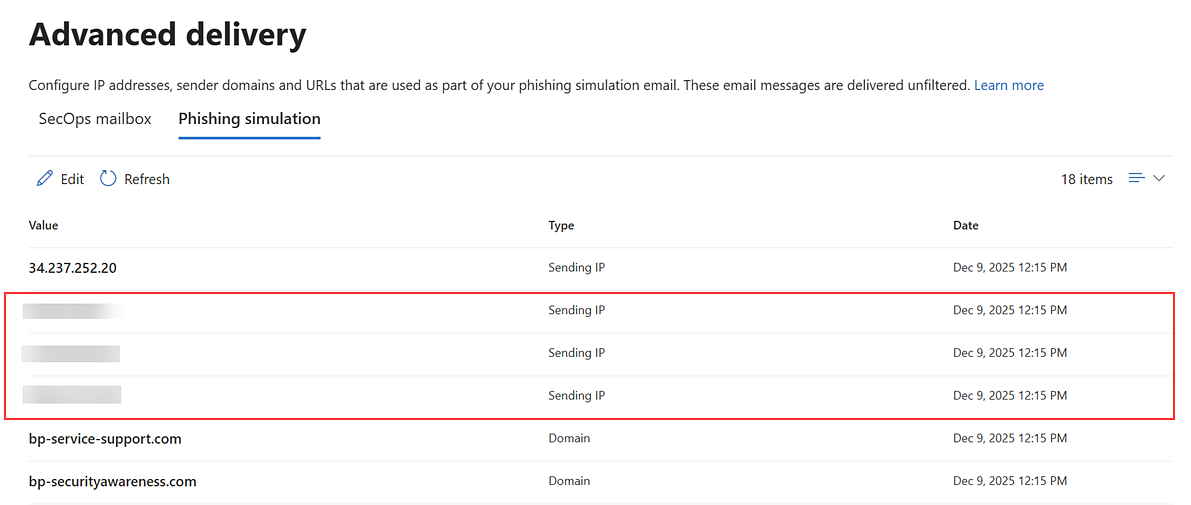
Configuring the email allowlist
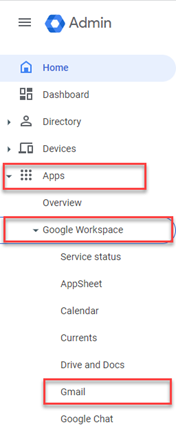
- Log into the admin console for your G-Suite account.
- In the navigation menu, select Apps > Google Workspace > Gmail.
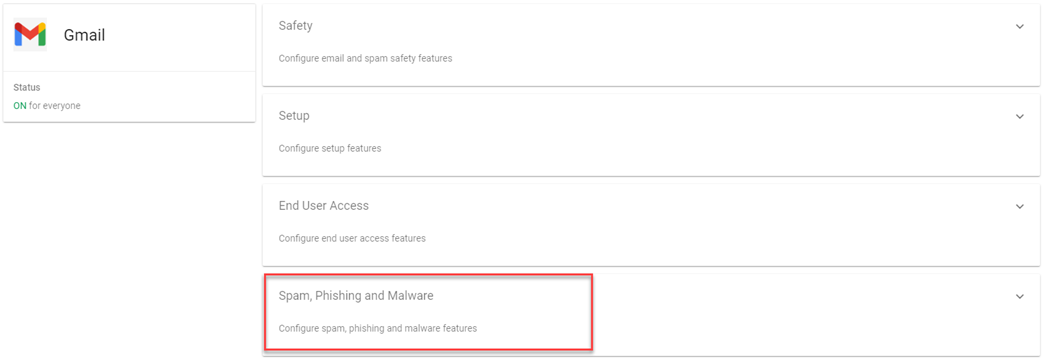
- Scroll down and click Spam, Phishing, and Malware.
- In the Email Allowlist section, hover in the upper-right corner and click the edit icon.
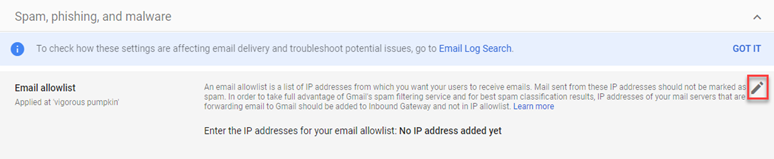
- In the Enter the IP addresses for your email allowlist field, add the IP addresses specified in the following INKY article: Phishing simulations. Do not delete IP 34.237.252.20. Separate each entry with a comma.
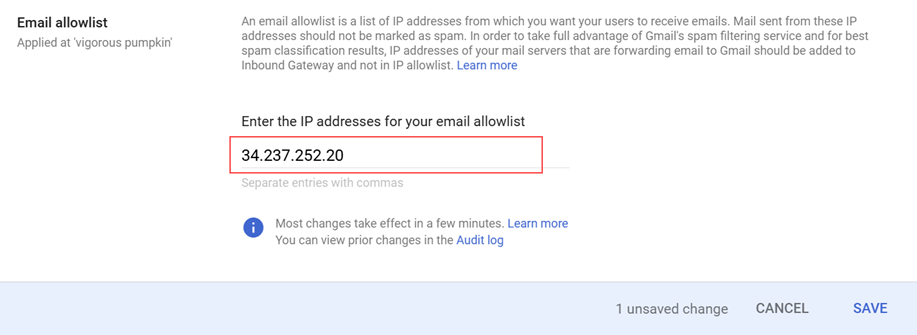
- Click Save.
If your organization has not yet configured Microsoft 365 or Google Workspace to ensure BPID campaign emails are delivered successfully, follow the applicable guide below. Integration steps for INKY are included in these guides:
| Revision | Date |
| Initial release. | 12/15/25 |
| How to: Added links Microsoft 365 or Google Workspace SF guides. | 1/8/25 |
| Current BullPhish ID users section: Added note referring to M365 auto-configuration. | 1/14/26 |
| Added link to BullPhish ID and INKY Integration: FAQs. | 1/16/26 |
| Google Workspace: Deleted steps for Configuring spam filters. | 4/10/26 |
| Added section: User reported phishing email. | 5/12/26 |


