Getting started with BullPhish ID
This article provides the recommended steps to begin the BullPhish ID onboarding process. You should perform the process in the order it is presented.
Logging into BullPhish ID
- Kaseya 365 subscriptions: If you are using BullPhish ID as part of your Kaseya 365 subscription, your experience starts in KaseyaOne. Follow the instructions in the Kaseya Welcome email you received. In KaseyaOne, when you click the Activate link for your new BullPhish ID module, you will be redirected to the BullPhish ID Reset Password modal. Follow the steps below to set your password and enable two-factor authentication.
- Standalone BullPhish ID subscription: When you were added as a new BullPhish ID user, you received a Welcome email explaining the steps for creating your password. When you click the link in the email, you will be redirected to the BullPhish ID Reset Password modal. Follow the steps below to set your password and enable two-factor authentication.
NOTE If you are using Dark Web ID and BullPhish ID:
- A single user login account is used to access both modules. Updating your password in either module will update it for both.
- For Kaseya 365 subscriptions, it is recommended you activate Dark Web ID first, then access BullPhish ID directly from the Dark Web UI (without clicking BullPhish ID's Activate link on the Kaseya 365 Setup Guide page).
Perform the following log in steps:
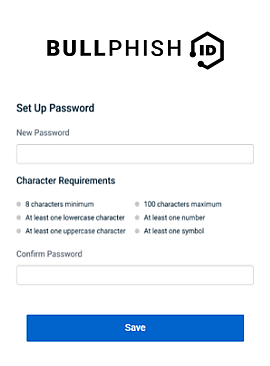
- In the BullPhish ID password modal, create a password per the requirements. Confirm the password and click Save.

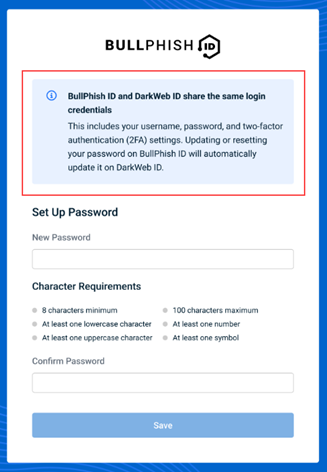
NOTE For users of both BullPhish ID and DarkWeb ID: The Set up Password modal includes a banner reminding users that BullPhish ID and DarkWeb ID share the same user login credentials (username, password, and multi-factor authentication (MFA) settings). Therefore, updating or resetting your password or MFA in BullPhish ID will automatically update it for DarkWeb ID.
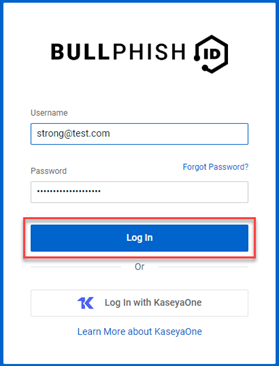
- In the BullPhish ID login modal, enter your Username and Password. Click Log In.

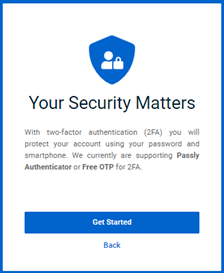
- In the Your Security Matters modal, click Get Started.

- If you have not already done so, download and install a two-factor authentication applications that is compatible with your mobile device:
- Google Authenticator
- Microsoft Authenticator
- In the Set Up 2FA modal, scan the QR code using the authenticator app on your mobile device.

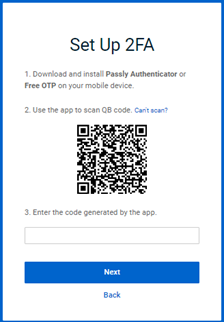
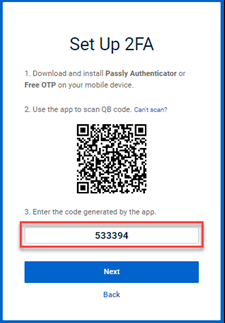
- Your 2FA app will generate an authentication code. In the Set Up 2FA modal - step 3, enter the code.

- Click Next.
- In the Success modal, click Done.

- With 2FA successfully setup, you are required to enter a new authentication code. In the Verification modal, enter the authentication code generated by your 2FA app.

- Click Verify.


NOTE If you are a partner administrator, after your first login, the self-guided onboarding feature launches automatically. See the next section.
Self-guided onboarding
The self-guided onboarding feature is designed for new partner administrators and provides on-demand interactive help. By presenting pop-ups, the user is introduced to key BullPhish ID features and how to use them.
For more information, see the article How do I access the self-guided onboarding feature.
Configure KaseyaOne Unified Login
KaseyaOne is the customer portal and central hub for all Kaseya IT Complete portfolio products. Configuring KaseyaOne Unified Login provides easy access to all of your IT complete modules.
- Kaseya 365 customers: Connect BullPhish ID to KaseyaOne by enabling Unified Login.
- Standalone BullPhish ID customers: It is highly recommended that you configure KaseyaOne Unified Login.
To enable this feature, refer to the article Enabling KaseyaOne Unified Login for your BullPhish ID organization.
Onboarding
Now that you've logged in for the first time, it's time to start working in the platform. This section introduces you to the BullPhish ID modules and is designed to get you started in BullPhish ID quickly and efficiently. It includes the initial setup steps for onboarding your organization. The sections should be performed in the order they are presented.
Configure email deliverability
First you need to configure one of the options for ensuring that your campaign emails are not blocked and reach your targets.
- Option 1: Integrate with Graphus
Graphus integration eliminates the need for whitelisting and ensure 100% campaign deliverability to your end users. The Graphus API gives BullPhish ID the ability to place phishing and training emails directly into end user inboxes as opposed to sending them through the internet, saving you hours of whitelisting time.
- Option 2: Safelisting
If Graphus is not set up for your clients, safelisting the BullPhish ID IP addresses and domains is crucial. Your email delivery platform must be configured correctly to ensure your campaign emails are delivered to your intended recipients. Safelisting guides are available for numerous email platforms.
After BullPhish ID is whitelisted in your client’s environment, you can start sending training and phishing campaigns.
Dashboard overview
The Dashboard is your central hub for tracking and managing activities:
- Track Subscriptions: View the number of Phishing and Training subscriptions used by SMB organizations.
- Monitor Campaign Status: Track the progress of Phishing and Training campaigns across SMBs (Completed, In Progress, or Scheduled).
- Add SMB Organizations: You can add SMB organizations in 3 different ways.
- SMB organizations added to the DarkWeb ID platform are automatically listed in BullPhish ID. From the left navigation menu, click Organizations and enable phishing and training subscriptions for the applicable organizations.
- Manually add SMBs on the Dashboard and Organizations page.
- Integrate BullPhish ID with IT Glue. Once configured, SMB organizations with matching names in IT Glue and BullPhish ID will sync automatically. Additionally, you can import organizations directly from IT Glue into BullPhish ID.
- Add new Partner User: Add more partner users to work with your BullPhish ID account by clicking the Settings button, selecting the Partner User Access tab and clicking the Add User button. For a description of the permissions granted with each role, see the article BullPhish ID user roles.
Organizations Module
In the left navigation menu, the Organizations module provides information for each of the partner’s SMB organizations. Information can be edited directly in the table or by accessing the organization’s Edit page. The Add SMB Organization and Settings buttons on the Dashboard are also available on the Organizations page.
Phishing Simulation Module
In the Phishing Simulation module, users can create and monitor phishing campaigns.
- Create campaigns:
- Click Create Phishing Campaign to set up campaigns for all your clients at once, then complete the campaign details. Select recipients and set simulation frequency.
- Add phishing kits by dragging them to the designated area.
- Manage campaigns: Use the View All Campaigns page to oversee all of your campaigns.
- Phishing kits:
- In the left navigation menu, under Phishing Simulation, click Phishing Kits page to access pre-made phishing kits and custom kits created for your clients.
- Create custom kits or view details of existing kits, including templates and landing pages.
Training & Awareness Module
Deliver effective security awareness training to users:
- Customize your Training Portal:
- Set up a branded, whitelabeled training portal.
- Configure user login requirements, email templates, and quiz settings.
- Create Training Campaigns:
- Click Create Training Campaign and add campaign details.
- Assign groups and courses to the campaign using a drag-and-drop interface.
- Set up Global Training Reminders: Send email reminders automatically to users who have not yet completed their scheduled training courses.
- Manage Campaigns: Use the View All Training Campaigns page to oversee all campaigns.
Reporting Module
Generate reports to track the impact of your campaigns.
- Export Reports: Download business and end-user reports directly from the Export Report page.
- Automate Reporting: Schedule regular email delivery of reports to stakeholders via the Automate Reports page.
Settings Module
Customize application settings to align with your needs.
- Email Templates: Create custom phishing and training email templates or use global templates.
- Sending Profiles: Define the sender’s email address for campaign emails, automated reports, and email reminders.
- Sending Domains: Set up and manage custom sending domains for your SMB organizations. In addition, you can export a list of their custom and global sending domains.
- Integrations: Sync BullPhish ID with Kaseya products like Graphus and IT Glue to ensure data consistency across platforms.
Additional Resources
Guides: Access detailed documentation, including safelisting instructions, user manuals, and release notes.
IT Complete integrations
Depending on the other IT Complete modules active in your stack, you can take advantage of the following integrations to improve security and overall operations:
- Graphus: BullPhish ID integration with Graphus
- Autotask or BMS: Integrating BullPhish ID with Autotask or BMS
- Compliance Manager: Integrating BullPhish ID with Compliance Manager
- IT Glue: Integrating with IT Glue


